
Promote Your Event on Facebook
This article (that I wrote) was originally published on Social Media Examiner.
Do you use Facebook Events to promote your events?
Wondering how to use Facebook ads with your Facebook event?
In this article, you’ll discover four audiences I use to successfully promote events on Facebook.
But first, you need to make sure your event is set up properly. If you’ve nailed this part – skip to number 5.
#1: Set Up Ticketing for Your Facebook Event
You want to make it as easy as possible for people to buy tickets to your upcoming event, and there are a number of platforms that integrate with Facebook event pages for onsite ticket sales like Eventbrite.
If you’re using Eventbrite to host your ticket sales, you can integrate it into your Facebook event so people can buy tickets without leaving Facebook. It’s best to set up your Eventbrite event before you create your Facebook event, but it can also be done afterward.
Before you launch your Facebook event, make sure you add your Facebook pixel (and any other tracking) to Eventbrite to capture data you can use for retargeting. After you set up your event in Eventbrite, click the Manage tab and navigate to the Tracking Pixels section.
Next, click Facebook Pixel and enter your pixel ID and other details.
While you’re here, you can also add other tracking such as Google Analytics. You can never have too much data!
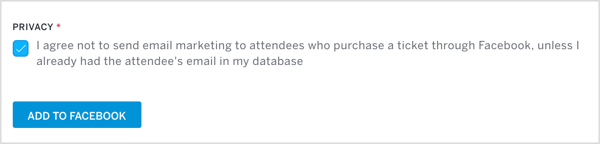
Once your Eventbrite event is set up with all of the appropriate tracking, you can publish your event and add it to Facebook. Eventbrite will most likely prompt you to do this and guide you through the process.
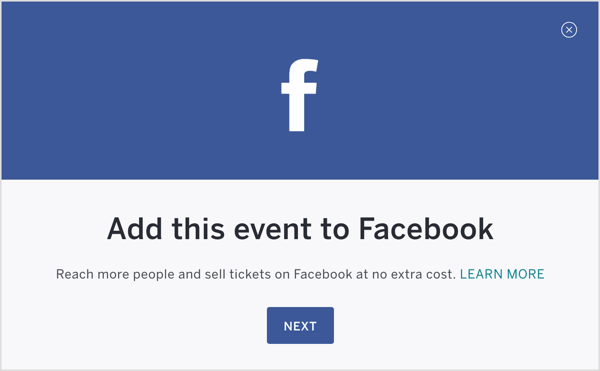
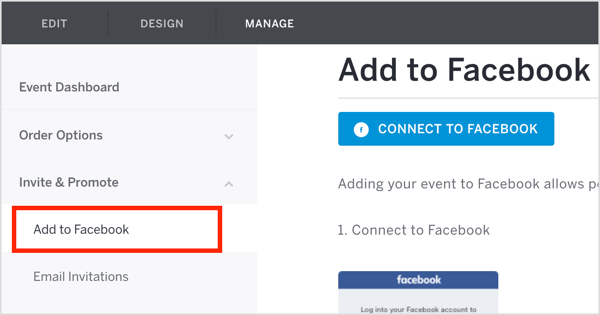
If it doesn’t, you can manually do it. On the Manage tab, click Invite & Promote and select Add to Facebook from the drop-down menu.
Either way, you’ll need to select the event and choose the Facebook page to host the event. You must be an admin of the Facebook page you’re using to host the event.
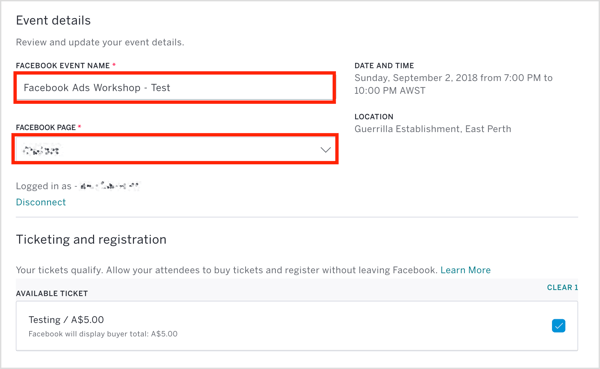
Once you’ve done this, click Add to Facebook.
Your event will now be added to your page and also appear as a post in the news feed. This is what the Facebook event will look like to you as an admin:
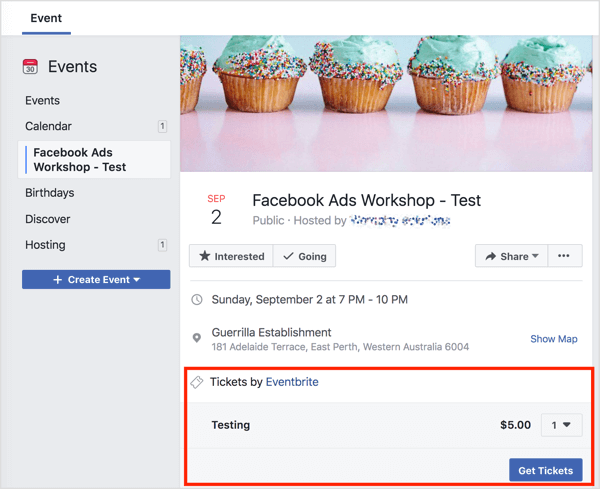
If your page and event are eligible, your attendees will be able to use Facebook’s own checkout experience, as shown here. You want to make it as easy as possible for people to buy tickets to your upcoming event!
#2: Add the Venue and Sponsors to the Facebook Event as Co-Hosts
Adding co-hosts to your Facebook event will allow them to post in the event itself. When you post content, users who’ve responded to your event will get a notification. This will keep the conversation in one place (making the most of the notifications) and allow the appropriate people to answer any queries about your event.
To add co-hosts’ profiles individually, you must be friends with the person, or you can add pages.
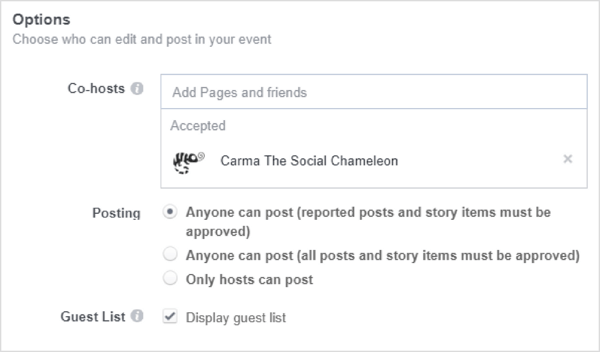
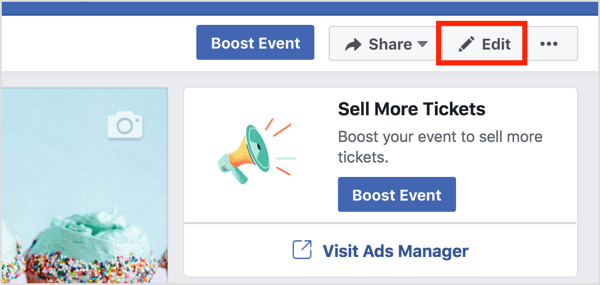
You can add co-hosts when you initially set up the event or after you’ve created it. To add a co-host to an existing event, click Edit on the event page.
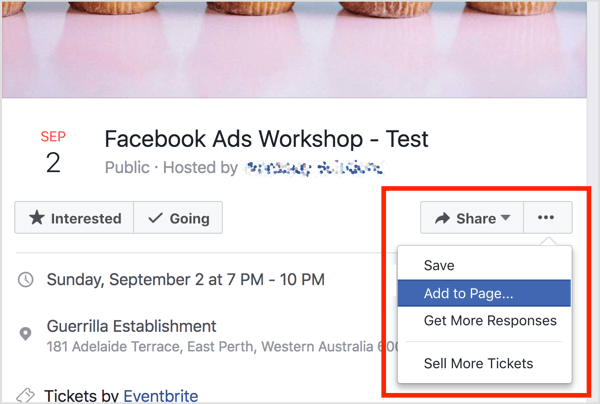
You or other stakeholders may want to display the event on your Facebook pages. This is easy to do, and it’s a good idea to add the event to any relevant pages so there are no duplicates.
If you’re an admin of the stakeholder pages to which you’d like to add the event, click the three dots button at the top of the event page and select Add to Page.
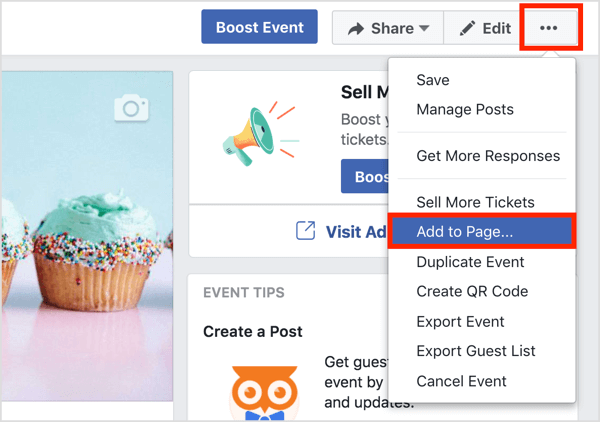
In the drop-down menu that appears, choose your page.
If you aren’t an admin, you or your stakeholders can still add the event to your pages in a similar way. Go to the event, click the three dots button, and select Add to Page. When prompted, choose a page from the list of available pages.
#3: Tips for Posting on the Facebook Event Page
The Facebook event page can be a busy place. You want to make the most of it because this is a captive audience of people either attending or considering attending your event.
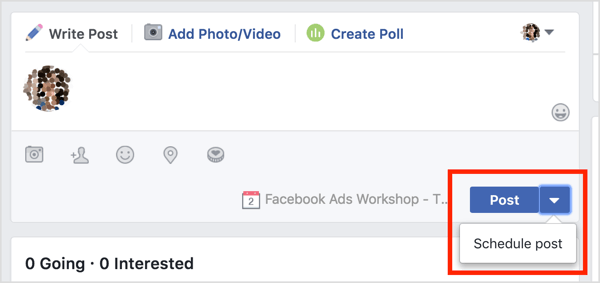
But you also don’t want to overdo it and annoy your audience, so take advantage of the new ability to schedule posts to the Facebook event wall.
To encourage people to attend, tell them what they can expect on the day (or night) of the event. For instance, if you’re running a seminar, share some information about the speakers.
You might also inform people about facilities and services available at your event. To illustrate, post parking information, a venue map, transport, dietary information, and payment methods.
#4: Get Your First 15 Facebook Event Attendees
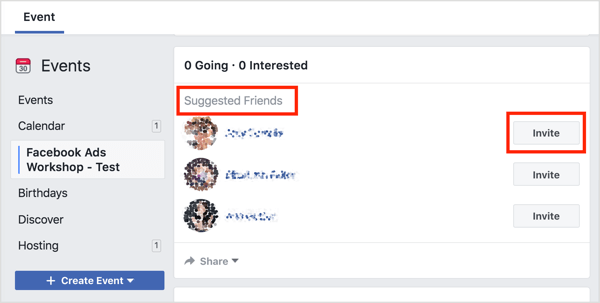
You can pay to promote your event only if 15 people at minimum respond that they’re attending. So how do you get your first 15 attendees? Facebook will suggest people who are your friends who also like the host page as a first option.
But you can invite any of your friends. Do this sparingly, though, and only invite people you genuinely think would want to attend your event.
You, your sponsors, the venue (if appropriate), and the speakers (if it’s a conference or seminar) should all share the event to your respective pages. Also share your event with any relevant Facebook groups, your customer database (be mindful to remain compliant with privacy laws in your region), and any lists of past attendees if this is a recurring event or your business has hosted similar events before.
If your event is interesting, well described, has good clear imagery, is held at a time and place people can easily commute to, and is a reasonable price, you shouldn’t have any trouble getting these first 15 “going” responses. Then you can use the power of Facebook ads to ramp up your event promotion!
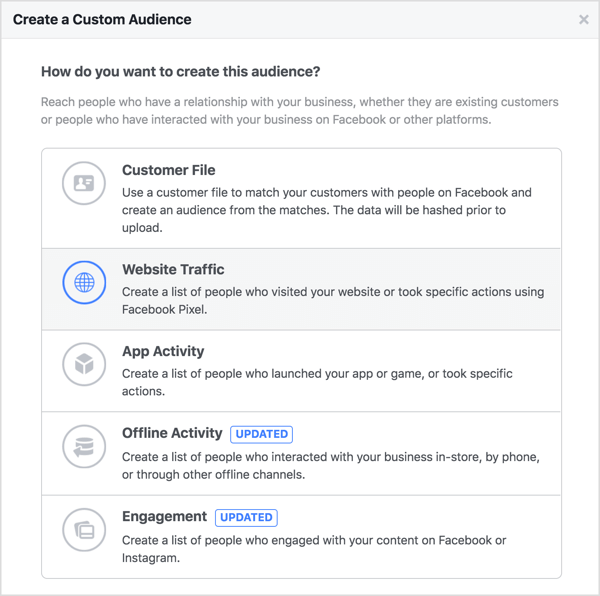
#5: Create 4 Custom Audiences to Target With Facebook Ads
When you set up targeting for your Facebook campaign to drive ticket sales for your event, it’s important to split test the creative, copy, call to action, and so on, as well as the audiences themselves. Interest targeting will work in some cases, but your best and safest audience to get some purchase conversions is with four main custom audiences. Let’s walk through how to build them step by step.
Your Current Customers + Lookalikes
If your business is hosting an event, it’s likely highly relevant to your customers. Provided your customer data has been collected with permissions to be used for marketing (check your local laws if in doubt), you can upload the customer data to Facebook to create a custom audience.
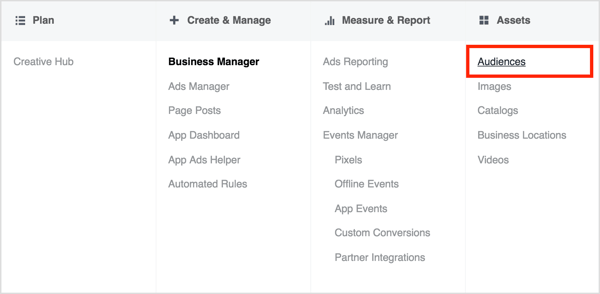
To do this, open Business Manager and select Audiences in the Assets column.
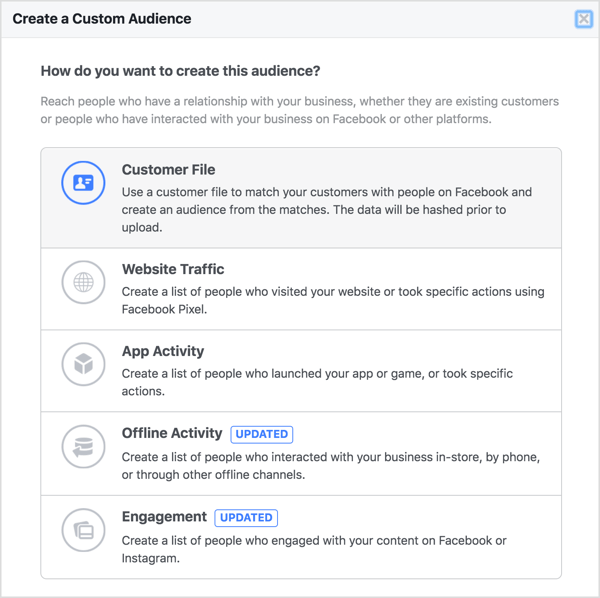
Once you’re in the Audiences section, click Create Audience and select Custom Audience from the drop-down menu.

Next, you’ll see a list of options on which you can base a custom audience. For this audience, choose Customer File so you can upload your customer data.
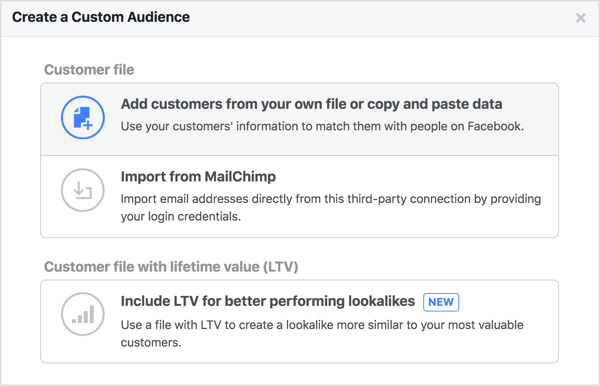
To create your audience, your options are to upload your customer database as a .csv file, cut and paste data from it, or import the data from your MailChimp account.
For this example, select Add Customers From Your Own File or Copy and Paste Data.
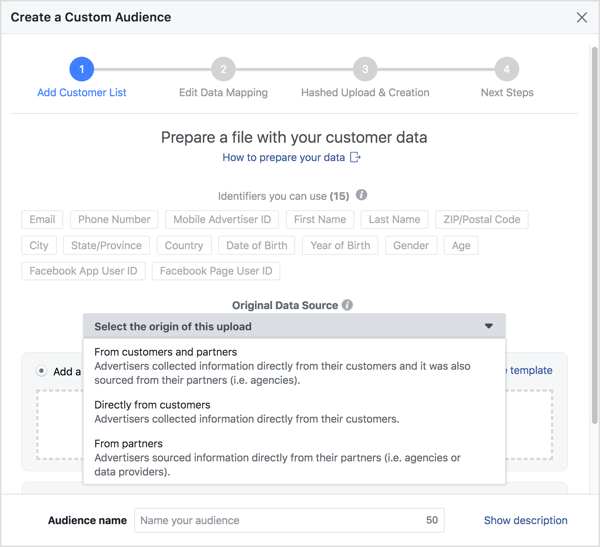
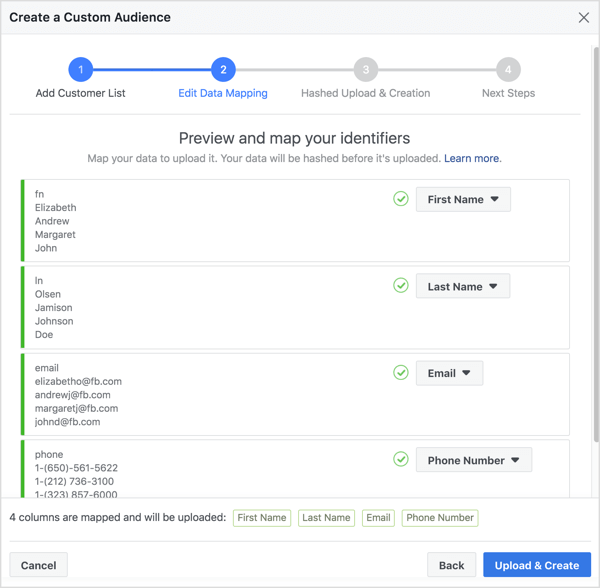
Next, specify the origin of the data, upload your file, and give your audience a name. When you’re finished, click Next.
Facebook then maps the data to the available identifiers. In the image below, there are four mapped data fields: First Name, Last Name, Email, and Phone Number.
If everything looks okay, click Upload & Create and the list will start populating.
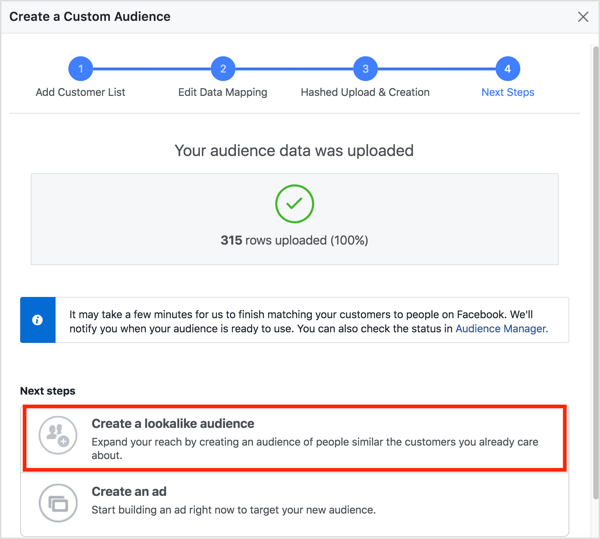
Facebook hashes the data so it can’t be hacked or stolen and used to identify your customers. You’ll see the message below if the upload is successful.
The next step is to create a lookalike audience. When you do this, Facebook will select an audience to target based on commonality with your current customers from the original database. When you see the page shown below, click Create a Lookalike Audience. You’re then prompted to choose a region and click Create.
Now you have your first custom audience and lookalike audience to use in your campaigns!
Previous Attendees + Lookalikes
If you’ve held this event before or it’s similar enough to a previous event that the same people will be interested, you can create a custom audience (and subsequent lookalike audience) of your previous attendees.
Follow the same steps outlined above, but this time, use your database of previous event attendees instead of your customers. Make sure you name this audience in an easily identifiable way, so you can compare their performance metrics later and not get confused.
Also create a lookalike audience. This audience will include people who have matching attributes to your previous attendees, which can be an effective way to target your campaign.
People Who’ve Engaged With Your Event + Lookalikes
It’s likely there are people who are interested in going to your event and have looked at your event page, but haven’t yet purchased tickets. Because they’ve indicated interest in your event by engaging with it, you can create a custom audience based on this engagement and use it in your campaign.
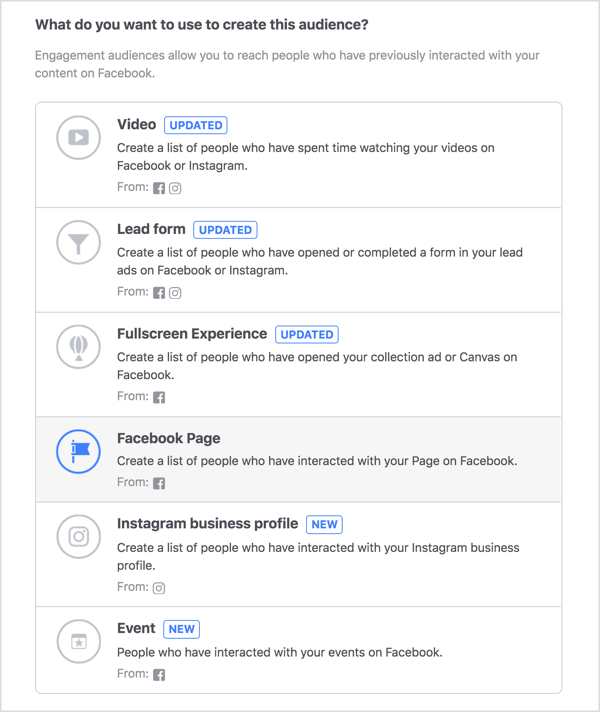
Start the process in the same way as the custom audience you built from your customer database. When you reach the How Do You Want to Create This Audience screen, select Engagement.
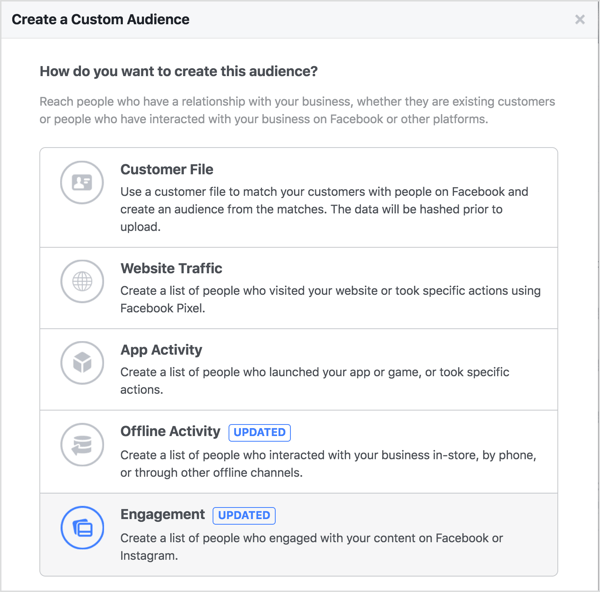
Next you see the options for creating a custom audience based on engagement. Choose the Event option.

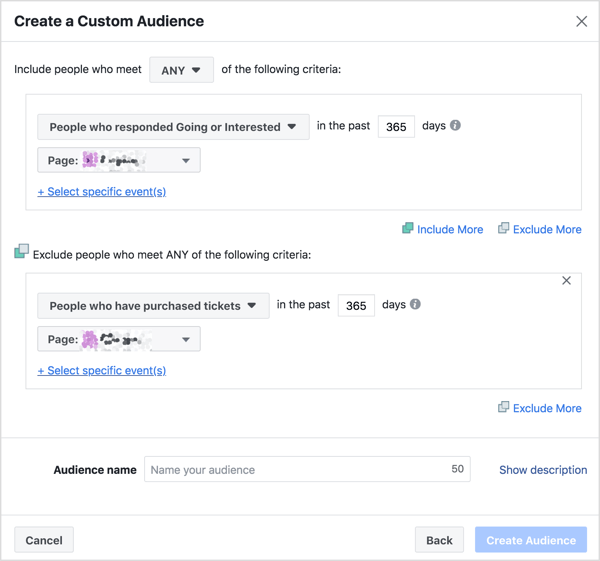
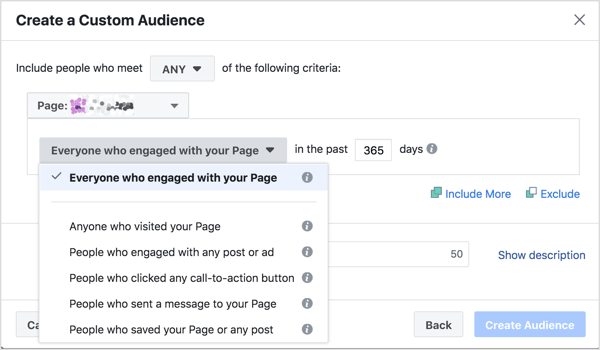
Then you see the audience creation window. Here you can choose options for the level of engagement people have displayed in your Facebook event, select a time frame for that engagement, and exclude anyone you don’t think is relevant from your audience.
Because Facebook will only let you use these audiences in campaigns if they’re large enough (you need 1,000 people to meet the criteria), you may need to experiment to find one that will match your needs.
If you have a large-scale event, you can make these conditions quite detailed. However, if you’re a smaller business with a more locally focused event, keep them fairly broad so enough people have performed the necessary engagement to be added to the audience.
You can create as many of these audiences as you like and choose which ones to use later once they’ve populated and have a size indicated.
For this example, create your audience based on people who responded “Going” or “Interested”, but exclude people who have already purchased tickets.
Once you’ve created this custom audience, you’ll be prompted to also create the lookalike. As with the previous audience segments, it’s a good idea to do so and test this audience in your campaign.
People Who’ve Engaged With Your Facebook Page or Instagram Account
As with the above custom audience based on engagement with your Facebook event, you can also build audiences based on engagement with your Facebook page and Instagram business profile.
If you’ve been posting relevant and engaging content on your brand channels that align with the event theme, it’s likely people who’ve engaged with you will be open to hearing about your event.
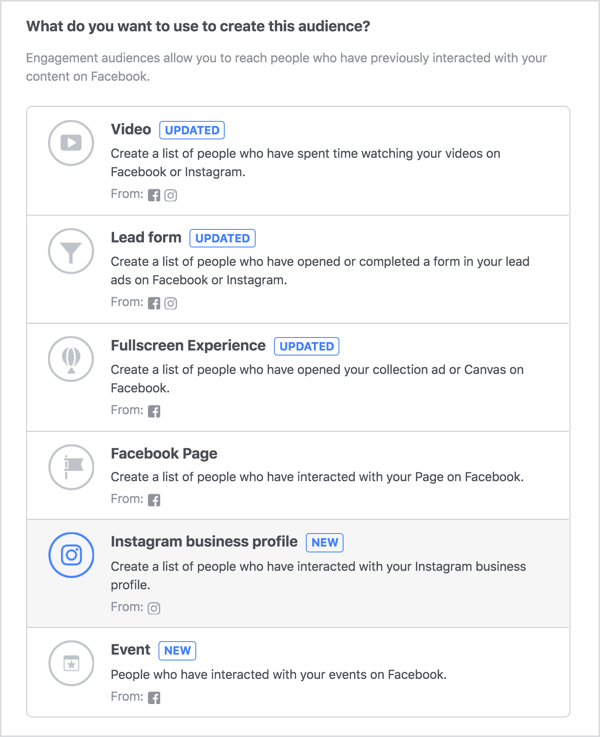
As with the previous audience segment, start by going to Audiences to create a new custom audience. When you’re asked how you want to create this audience, choose Engagement again and then select Facebook Page.
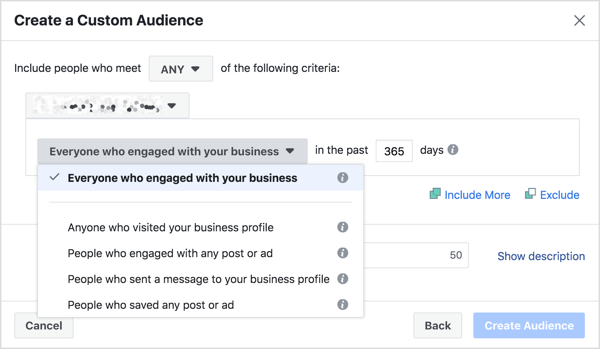
Now you need to specify the criteria people will need to meet to be included in this audience. Because this audience will include people who have engaged with your page but not the Facebook event page specifically, choose a relatively non-passive action such as engaged with a post, clicked a call-to-action button, sent a message, or saved a post. These are the more active interactions a user can have with your page.
As with the Facebook event engagement audience, you need to make sure the audience size is large enough to run. If you have a high level of engagement on your Facebook page, you can afford to be more specific about your criteria. If your engagement is lower, you’ll need to be broader.
You can, of course, create multiple audiences with different parameters and split test each one if you like.
Unlike the other custom audiences, I don’t use the lookalike option here. I don’t find that people who “look like” they engaged with your Facebook page have enough intent to purchase an event ticket. However, if you think this will work for your page, create the lookalike and add it to the mix!
Next you can build a similar engagement custom audience with your Instagram business profile. Note that you can’t create this type of custom audience for an Instagram personal profile. It needs to be an Instagram business profile that’s connected to your Facebook page and Business Manager account.
As with the Facebook audience, create a new custom audience based on engagement, but this time select the Instagram Business Profile option.
In the audience creation window, you can choose a specific time period and certain parameters of engagement with your business. Again, you need that magical minimum number before this audience can be used in a campaign. Depending on the level of engagement for your Instagram account, adjust the options accordingly.
Remember that this audience will only serve you if the content you post on your Instagram aligns with the core purpose of the event.
Always Exclude Purchasers
When running a Facebook campaign, it’s often more important whom you exclude from your targeting than include. To maintain a high relevance score and low negative feedback (which affect the cost of your campaigns), make sure the audience that sees your ads is open to the messages contained in them.
If someone has already purchased tickets to your event, serving them ads to get them to buy tickets is wasteful. So how do you exclude ticketholders? There are a couple of ways to achieve this.
First, you can pull an event database daily and create a custom audience as in the first example, but this time made up of people who already have tickets. Then when you build your ad targeting, select this audience to exclude. While this tactic is very accurate, it can be a bit time-consuming because you have to constantly create and amend your ad targeting.
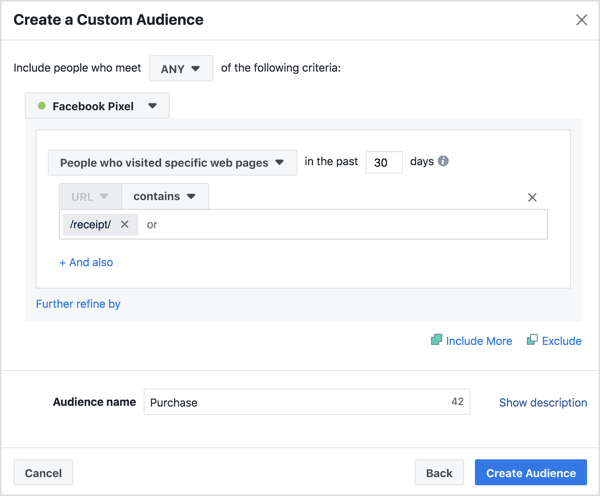
The easier way is to use your website and pixel data. Using the URL displayed when a ticket purchase is completed (whether that’s a thank-you message, receipt, or confirmation pop-up), create a custom audience based on website traffic to exclude people who have already purchased a ticket.
When you create this custom audience, select Website Traffic.
In the audience creation window, set the parameters of your audience based on website activity including pages viewed and time on page.
In the example below, once a purchase is processed, the user is sent a unique receipt URL, but all of the URLs “contain” the “/receipt/” parameter. If you have a specific landing page for the purchase confirmation, you would select URL Equals and paste the exact URL into the box.
Finally, name your audience and add a description if desired. Then click Create Audience.
And there you have it: four audiences to target and one to exclude. When you set up your campaigns, you can split test these audiences until you find the ones that have the lowest cost per action and scale them. Any non-performers can be stopped at any time, although I recommend giving them enough time to optimize (at least 3 days).
To manage this process (which looks like a lot of work, but is very quick once you get the hang of it), it’s helpful to create all of your audiences first and leave them overnight to populate before you create the ad campaign.
#6: Create Your Traffic/Conversion Funnel
Events are fun! People like attending them, so as a rule, they don’t need a particularly complicated sales funnel. But like any Facebook ad campaign, the people most likely to complete a purchase conversion are those who’ve already performed the preceding action.
For instance, if you’ve used custom audience targeting to attract traffic to your website with either Link Clicks or Landing Page Views objectives, you’ll get some sales right away, even from cold traffic.
Some people will be excited about your event and won’t hesitate to buy tickets. But events can be expensive to run, so you’ll likely need more than these organic ticketholders to make your event a success. This is where retargeting comes in as you move users down the funnel.

The audiences you’ve made that include your customers, people who’ve engaged with your Facebook event or social media channels, and people who’ve attended your previous events are all considered warm traffic. They know who you are and what your brand is about.
Many people in the lookalike audiences you created (and any interest targeting you may use) are potentially cold traffic. They haven’t heard of you, they don’t know what you’re about, and they’re less likely to attend a business event you’re hosting.
With event marketing, you often don’t have time to build traffic in a phased campaign approach like you would with other types of campaigns. So you need to keep your funnel simple and let the retargeting do the heavy lifting with the engaged audiences.
Once people have visited your website, found out more about the event, and demonstrated an interest in attending (in other words, have been warmed up), make sure you serve ads to them on Facebook and Instagram.
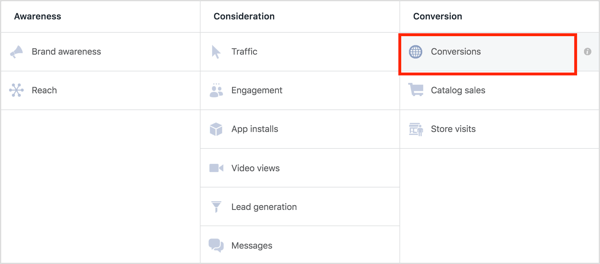
The most cost-effective way to do this is to run a Facebook ad campaign specifically for people who added tickets to their cart but didn’t check out. They’ve shown the highest intent to buy, and therefore are your lowest hanging fruit in the funnel. You can target this bucket of users with the Conversions objective.
Simply target traffic that’s added to the cart (which you know from the Facebook pixel) and exclude the purchasers (as explained at the end of section #5 above). Then all you need to do is wait for it to optimize and see if it’s going to convert at an acceptable cost. If so, scale up the spend because more money in equals more money out.
If not, analyze the results. Put yourself in the buyer’s shoes and work out what stopped them, and either fix it or find a way around it.
Who else can you target with Conversions ads? Potentially your current customers and previous event attendees who will start at the middle of the funnel, bypassing the cold traffic stage.
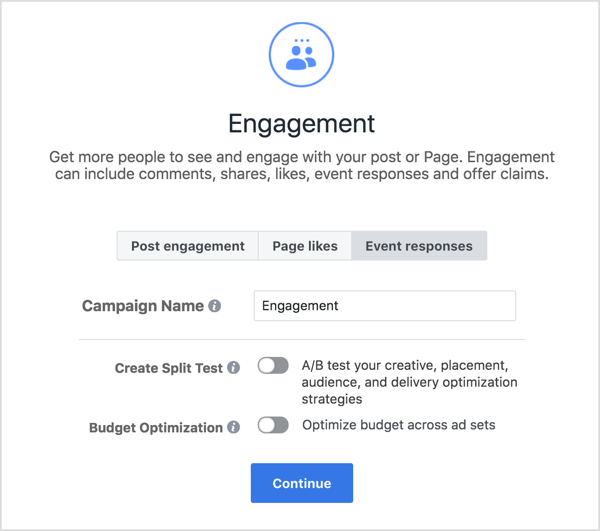
What other objectives might you run? Engagement ads in the form of Event Responses. Remember how valuable the wall of your Facebook event page is? And if people engaged with your Facebook event, they’ll fall into your retargeting bucket.
And if your event has door sales available and your budget allows, run Reach objective ads to the local community that fit your event demographic.
There will always be people who don’t want to be locked in and prefer to buy tickets on the day of an event. If they’re aware your event is on, you still have a chance that they’ll attend. If you choose the Reach objective, you can easily cap the frequency and reach of the campaign to avoid annoying your audience.
What do you think? Do you use Facebook ads to drive ticket sales for your event? Have you created some of these custom audiences? What tips can you offer for promoting your event on Facebook? Please share your thoughts in the comments below.